Whether your current HVAC system needs to be replaced or you’re moving into a new home, installing an HVAC system requires a lot of work. While this project isn’t as inconvenient as a major home remodel can be, there are important steps that take place before, during, and after installation. Knowing what to expect will help you prepare for your new HVAC installation.
Preparing for the HVAC Installation
Several things must be done in preparation for an HVAC installation. The first is that the installation site and your current HVAC system will be inspected. A site evaluation is meant to help the HVAC professional identify any aspects of the job that may have been overlooked during the first consultation.
The site evaluation allows the HVAC professional to bring the right tools for the job. All animals and children should be kept away from the installation site to make sure that everyone remains safe.
On the day of the installation, a conversation with the installation team will occur to ensure everyone’s on the same page. Drop cloths will likely be placed around your home to protect the floors and important possessions.
All tools and equipment needed for the installation will be taken into the home before work begins. The final step in the preparation process involves implementing safety procedures, primarily to turn off the electric supply or gas service valves.
Installation Process
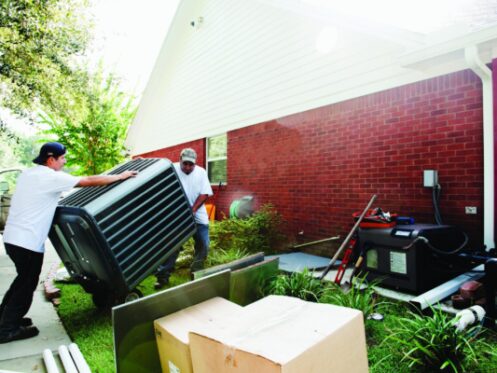
Even if an existing unit needs to be removed, the HVAC system installation process rarely takes more than one day to complete. The initial step of this process involves removing the old unit. It will begin with draining the refrigerant, which needs to be properly recovered before the entire unit can be removed. EPA regulations dictate that anyone who works with refrigerant must have the right certification. Those who work on an HVAC install team will have this certification.
After the refrigerant is recovered, the old electrical wiring is also removed. The technicians will ensure that the breaker is off at the electrical panel. The old wiring around the HVAC unit can then be removed without issue. Once the wiring is gone, the unit can be taken out.
After removing the old unit, the area might need to be prepared for the final installation. For instance, the new equipment may be larger than what’s being replaced. For the outside unit, it’s possible that the ground below the unit has sunk somewhat over time. If this has happened, the ground will need to be leveled before a new HVAC system can be installed.
Removing Extra Equipment
Before the new unit can be installed, the indoor evaporator coil and copper lines may need to be removed. The evaporator coil is the part of the HVAC system that the refrigerant lines are directly connected to. It’s typically situated above a home’s furnace. Access to this area can be restricted because of a finished basement or closet. Your HVAC professional will need to carefully assess the area to figure out how long it will take and how much it will cost.
As for the copper lines, there are two lines that carry refrigerant and oil from the outdoor unit to the indoor evaporator coil. It’s possible for these lines to be located in concrete, below the floor, or in the ceiling. While the copper lines are usually replaced, doing so may be impossible, depending on where the lines are located. In this scenario, the set of lines will be flushed and cleaned out before installation continues.
Installing New Equipment
Now that all the old equipment has been removed, the new components will be installed. The first piece of equipment to be installed is the indoor evaporator coil. These coils can be cased or uncased.
A cased coil is positioned freely on top of your home’s furnace, which makes for a simple installation process. In comparison, uncased evaporator coils must be maneuvered to the correct position in the air handler, which results in a lengthier installation process. Despite their differences, the life expectancy and comfort of cased and uncased coils are the same.
If your old copper lines are being replaced, the two new ones will be installed once the evaporator coil is in position. These lines consist of a suction line and a liquid line. These lines run from the outdoor air conditioner to the evaporator coil. They must be firmly secured every three to six feet to prevent leaks. A filter drier may also be installed to prevent moisture from entering your refrigeration system.
Installing the Primary Unit
After all of the surrounding equipment is installed, the new unit will be removed from its crate and checked for any damages. The system will then be placed on the pad exactly where the old unit was situated.
At this time, the refrigerant lines are fitted to the necessary service valve. The lines and valves are welded together to create a leak-free connection. Possible electrical upgrades are made to ensure that the system runs smoothly. These upgrades can include new connections, wiring components, and a service disconnect box.
When an HVAC system completes the cooling process, all condensation that builds up must be dealt with. Some systems use a condensate pump, while others allow the moisture to drip to a floor drain pan. In either case, a drain line must be installed alongside the HVAC unit to divert the moisture outside. Once installed, this line will protect your home from leaks or moisture buildup in the walls.
After Installation Touch-ups
Following installation, the clean-up process takes place, which mainly involves making sure that the area is as clean as it was before installation. The HVAC technician will then guide you through all the steps taken during the installation before having you look at the new equipment. If your thermostat is new, you’ll also be given instructions on how to use it to operate the HVAC system. Warranty info could be discussed as well.
It’s common for a follow-up inspection to be performed several days after the installation. During this inspection, the HVAC system’s location will be checked, and your thermostat will be tested. The HVAC professional will also make sure that the airflow is strong enough. If you have any questions about how to use your HVAC system, now is the time to ask.
If you’d like to upgrade your existing HVAC system, our skilled HVAC technicians can complete this project without making costly mistakes or damaging your new unit. We can help you choose a system that suits your needs and fits well in your San Antonio, TX home.
After installation, we offer top-quality repair and maintenance services. We also offer indoor air quality services and air duct cleaning. Our locally owned and operated company partners with the best brands in the business. If you need heating or cooling services for your home or business, call Air Authority, A Riteway Service Company today to learn more about our offerings.

